Monday, May 30, 2016

Lessons Learned from Memorial Day Craft Fair

BayMoonDesign Table at Delaware by Hand Memorial Day Show
Once again I participated in the  Delaware by Hand Memorial Day Show held at the Zwaanendael Museum in Lewes, Delaware.  I did well at the show for a number of reasons that I would like to pass along to other crafters. 

1. Weather--I have no control over weather but monitor closely. This year the day was hot with brilliant sunshine and no rain.  Good weather is always a positive!  I picked up 2 plastic drop clothes just to be safe.  I have gotten caught in the rain before and don't use a tent unless it is a steady soaker.  Way too lazy for that!  I dressed for the weather.  I wore sunscreen 50, shorts, and a straw hat.  Also, sprayed myself with bug spray which I hate, but bugs usually love me.  I also brought a large refillable container of water with ice cubes and lunch.

2. Different Price Points-I put a price in large print on every item and still some had trouble finding the prices.  I sold items from $4 to $60.  I try to have more items in lower price range than higher.

3. Variety--I don't know about the craft fairs that you are in, but it is rare that I am in a craft fair that doesn't feature lots of jewelry.  To work around this problem,  I try to have a variety of non jewelry items and a variety of jewelry on my table.  I have lots of handmade cards, a few boxes of wine charms, scarf pins, beach bag charms, purse charms, and ankle bracelets.  I also have 3 dozen children's necklaces.  This is in addition to my necklaces, earrings, and bracelets.  This year I really tried to keep my numbers of item displayed down and carefully selected pieces that were summery and nautical.  I think that having a table that was visually less cluttered was helpful.  I had some extra pieces in cases tucked under the table.  I actually retrieved a cat necklace from the stash when a woman specifically asked for one.  This also lightened my load


4.  Your display table--I have invested in a professional card rack and earring rack, and earrings cards.  I located some inexpensive frames and removed the glass.  I cut gold Stampin' Up card stock to be used as the backings and used a punch and semi-circular Stampin' Up punch to create the slit and holes for them.  I like to put some of my earrings in frames and locate them earrings near jewelry that they compliment.  I also have a uniform look in my materials.  I use gold tablecloths and a mix of black velvet and burlap displays.  I also have a sign that I hand in front of my table that was made by Vistaprint.


5--Packaging--I focus on creating some packaging to help display my items.  I developed packaging to showcase my Scarf pins, beach charms, anklets.  I used Stampin' Up card stock that I ran through my printer and punched a few holes to attach my scarf pins, etc.  This helped to keep the items from getting lost visually on the table and help the customers recognize what they are.  My pin charms go in small boxes with a sign in it that says wine charms.  My card rack even has the cards separated by type with signs that correspond with the holiday or occasion.  I put all of my cards in cello envelopes with my business card, price, and inside saying labeled.  Can you tell I am a retired librarian?

What tips do you have to share?


Thursday, May 19, 2016

We're All Ears May Inspiration Reveal:: May


 image, was originally posted to Flickr.com, then uploaded to Commons usingFlickr upload bot on 21:42, 3 August 2012 (UTC) by SarahStierch (talk).

May's "We're All Ears May Inspiration" is very flexible.  The theme is tea and we can be inspired by china patterns, the shape of teapots, the flavors of tea, the colors of tea stains, the messages of wisdom on the tags, a romantic table setting, petit fours, silver spoons and lace.   We can simply pick out what inspires us. What fun!  I saw this as an opportunity to try a totally new technique to me.


Arizona Green Tea
I decided that I would use a can of Arizona Green Tea as my inspiration.  I like the colors and pattern of the graphics on the can.  I have seen jewelry made from tin cans and always wanted to try my hand at it.  I have also been making jewelry parts from metal and I have tools from making handmade cards.  I was happy to find another excuse to use these tools from both sets of hobbies.  I have to justify my craft purchased to myself as often as I can!


To create earrings from the can,  I wash, dried and cut it apart. I saw this as an opportunity to use my heavy duty metal cutters. This wasn't necessary. They didn't even work well. Ordinary sizzors work just fine.  

Embossing folder
 Next, I used a texture folder with my Sizzix Big Shot machine to add some raised embossed texture to the metal.  It also gave the metal some additional body.

Metal Disk Cutter Punch
I then punched out the shapes with my Metal Disk Cutter Punch. Truth be told simple punches from a craft store will work and give more design opportunities.  I have a heart punch that I think will make some very cute earrings.  The metal on these cans was much thinner that I imagined!

File
I then used my hole punch to place holes where I wanted my jump rings to go through.  I filed any edges where they were sharp or irregular.   


3 styles of tea can earrings

I ended up making 3 styles of earrings.  I used 5 mm and 10 mm gunmetal jump rings and ear wires to bring out the black on the graphics.


Pink floral earrings
The pink floral earrings are my favorite.  I love the color and texture.  I used pink lava beads because they had lots of texture.

Floral layered earrings

These earrings are made by layering a small circle on top of a larger one. The gunmetal kidney ear wires give a totally different look.
Turquoise Dangle Earrings
Being the perfectionist that I am, I will have to redo these Turquoise Dangle Earrings so that some of the black graphic isn't on one of them.  I didn't have anymore of the can left when I discovered the imbalance.  I created what looks like a chain for these earrings by just connecting some jump rings.  I like the look it gives.

Now, that I have these earrings under my belt, I want to make some from Coke cans next.  I am wondering if I should put a sealant on top of the thin metal.  Any suggestions about that?  


Saturday, May 14, 2016

Bead Peeps Reveal May 15


I am participating in Bead Peeps 2nd Annual Swap'n Hop and paired with Marcy Lamberson.  She a glass artist who loves making people smile through her whimsical beads and sculptures. Marcy is also a glass teacher too who offers private lessons in her studio in Atlanta and group lessons at studios around the United States.


Marcy Lamberson
Marcy at work in her studio

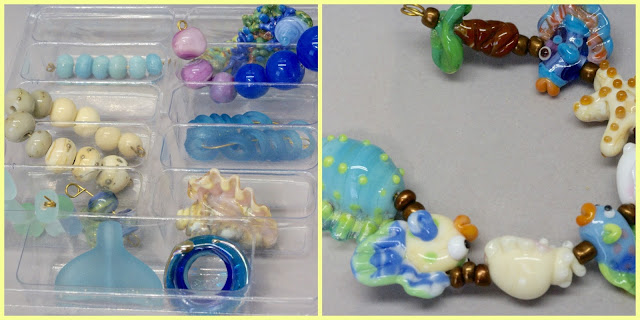
Marcy's art work is gorgeous.  Some of her work includes animal fetish beads and sculptures.  I was lucky enough to get some of her lampwork beads.  I suggest that you visit Marcy's Etsy shop  to look at more of her work.  She also sells on facebook from time to time. You can get to know her better on her blog.

Lamberson lampwork
Lamberson lampwork sent to BayMoon Design
I received these beautiful beads back in March.  I set out with the intention of using her gorgeous ocean focal beads to make some necklaces for an upcoming Delaware by Hand Memorial Day Show that I am participating in on May 29, 2016 at the Zwaanendael Museum in Lewes, Delaware.  I like to feature nautical pieces there at this historic beach town.  If you are in town, stop by and see these in person.

whale tale necklace
Whale of a Tale Necklace by BayMoonDesign
I call this my whale of a tale necklace.  The whale tale needed very little to showcase it,   I paired a darker turquoise leather with a gray leather and braided them together.  I added a few silver beads and silver end caps.  I think it makes a great summer necklace.

fish necklace by Bay Moon Design
Fish necklace by BayMoonDesign
Next, I just had to use the cute fishes and sea glass like beads that I was gifted.  I added them to sterling silver links and chain to create a charm necklace of sorts.


Blue Ring Necklace by BayMoonDesign
Blue Lampwork Ring Necklace by BayMoonDesign

I just love this large royal blue glass bead by Marcy.  It is so beautiful by itself that I that I wanted to showcase it in a simple design.  I used gunmetal chain and links along with the light blue glass links by Marcy.  This is a necklace can be worn with anything from jeans to a little black dress.

seashell necklace by Bay Moon Design
Seashell necklace by BayMoonDesign
Next,  I plucked up the gorgeous large, lampwork seashell and made it into a focal with some sterling silver wire.  I paired some of Marcy's cream lamp work beads with some gray cultured sea glass beads and silver beads that I had.  I grouped the beads by 3's and used silver chain to connect them.


daffodil bracelet
Daffodil bracelet  by BayMoonDesign


I wanted to make a few spring bracelets for my Etsy shop and some of Marcy's beads were perfect with 2 bracelet bars that I had,  This is a a floral bracelet that features a handmade yellow daffodil with green leaves on a pale blue background. The daffodil bracelet is held together with a handmade copper clasp by me. The floral art bead in the center is by Humblebeads. From the beads that Marcy sent I used her 3 handmade cream colored beads and the blue sea glass bead-- all perfect colors for this.  It is available for purchase HERE.


leaf bracelet by Bay Moon Design

                   Bohemian Leaf Bracelet by BayMoonDesign

This handmade bohemian leaf bracelet is made with a orange and forest green ceramic by artisan Mary Harding. I used one of Marcy's larger cream colored beads to frame and call attention to Harding's leaf bead.  I selected terracotta color Irish waxed linen thread.   The rust thread adds contrast against the neutral ceramics and faceted picture jasper beads.  Brass chain and clasp worked with the natural colors.  Both bracelets are for sale in my BayMoonDesign shop.

I feel like I made some of my best jewelry pieces ever because I had such inspiring and beautiful beads by Marcy.  I am thankful for her generosity.   

Grab a beverage and enjoy seeing what others did with their gifted beads.  A special thanks to our hostess:
Linda Anderson
#beadpeepsswap
Participants and their blogs:
SEEDERS
Palak (aka Pallavi Asher)http://kalaabhushan.blogspot.in/ Krafty Max http://kraftymax.net

Saturday, May 7, 2016

Inspired by the Blues in the May Art Bead Scene Challenge

                                                 
 "On a Shaker Theme", 1956 by Sheeler

                                                         "On a Shaker Theme", 1956
by Charles Sheeler
oil on canvas
with color palette

This month's inspiration piece is "On a Shaker Theme" by American modernist Charles Sheeler (1883–1965).  Showing his deep respect for Shaker design, Sheeler wrote, “The Shaker communities, in the period of their greatest creative activity, have given us abundant evidence of their profound understanding of utilitarian design in their architecture and crafts. They understood and convincingly demonstrated that rightness of proportion in a house or a table, with regard for efficiency in use, made embellishment superfluous,”  


handmade blue ceramic bracelet
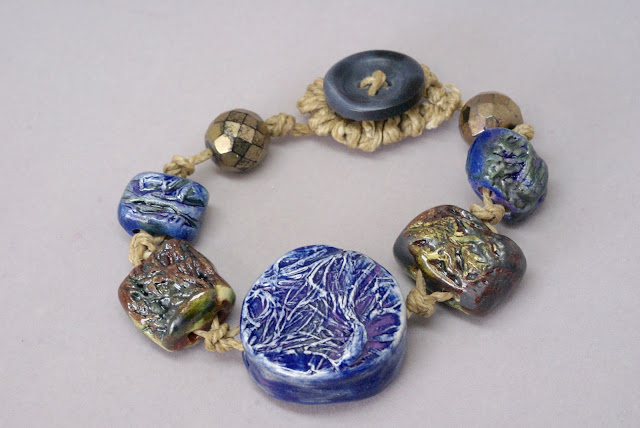
Textured Blue and Tan Ceramic Bracelet by BayMoonDesign

I decided to keep my embellishments simple in my piece also.  I selected a button and Irish Waxed linen to hold my bracelet together.  I used a lark knot to create the clasp for the button.  The Irish waxed linen is a matching tan and the button a dark blue.  The colors in the focal and four ceramic beads by Mary Harding capture the blues, tans in the oil.   The blues in the oil really appeal to be and so do the blues in Harding's ceramics. I also like all of the lines in the ceramics and the lines in the metal beads.  The lines remind me of all of the lines in the oil.

There are a number of tutorials on the Internet on how to make a lark knot.  I refer you to a tutorial by  Mary Harding, artist of the ceramics used here.  Click here for her tutorial.  I used this tutorial not only for the lark knot, but also for ideas on how to use her 2 hole beads.  All of her ceramics in this bracelet are 2 hole. Mary referred me to this tutorial when I asked her about her two hole beads. As soon as I read it, a light bulb off in my head for this bracelet design!

Handmade Ceramic Cabochon Cobalt Blue Wild Leaves by Mary Harding

                                         Handmade Ceramic Cabochon Cobalt Blue Wild Leaves by Mary Harding


I love Harding's ceramics and especially the blue glazes that she uses.  This cabochon is colbalt blue--a favorite of mine. I have been guilty of hoarding her beads because they are so pretty, but I had to make this bracelet for this challenge because her blue in the ceramics are perfect.  For last month's challenge  I used another of her ceramic bracelet bars.  Photos of the bracelet can be found on my blog "April's Art Bead Scene Challenge".

Ceramic bracelet bar by Mary Harding
You can see the similarity in the style of both focal ceramic--lots of lines with a rustic and earthy look.  I think you will agree that her ceramics are very special.